Thursday, September 8, 2011

Instant Prints

Creating instant prints from a digital camera is one of the new electronic inventions in printing. The Polaroid PoGo™ is a small portable printer that weighs only a few ounces.
latest-technology-inventionThe printer produces full color 2" x 3" prints using an "inkless" technology. The images are created from heat activated crystals in the photo paper. The photos are water proof, tear proof and smear proof.
This new electronic invention connects to a digital camera using a USB cable, or to a mobile phone through wireless Bluetooth. It uses rechargeable batteries or an AC adapter.

Sunday, September 4, 2011

Har Friend Zaroori Hai Yaar...

Chai ke liye jaise toast hota hai
Vaise har ek friend zaroori hota hai
Aise har ek friend zaroori hota hai
Koi subah paanch baje neend se jagaye
Koi raat ko teen baje jaan bachaye
Ek teri kadki mein sharing kare
Aur tere budget mein sneak in kare
Koi nature se guest koi host hota hai
Par har ek friend zaroori hota hai
Ek ghadi ghadi kaam aaye par kabhi kabhi call kare
Ek kabhi kabhi kaam aaye aur ghadi ghadi call kare

Gossip ka koi ghoomta phirta satellite
Koi sath rahe toh kar de sab alright
Koi effortless koi forced hota hai
Lekin har ek friend zaroori hota hai

Chatroom friend koi classroom friend
Koi bike pe race wala vroom vroom friend
Shopping mall wala shopping friend
Exam hall wala copying friend
Movie buddy groovie buddy

Hi buddy.... bye buddy
Joke buddy poke buddy
Gaana buddy shaana buddy
Chaddi buddy yaar buddy
Kutte ...... kamine
Everybody... sab buddy
A to Z

Gin din ke naam bheja roast hota hai
Par har ek friend zaroori hota hai
Lekin har ek friend zaroori hota hai
Guys guys principal.. principal.. principal..
la la la... la la.....
Har Friend Zaroori hai, yaar!

Saturday, September 3, 2011

Avoid 6 Common Blogger Mistakes

If you want your Blogger blog to sizzle and really take off there are some pretty important blogging pitfalls that you need to avoid. In today's article I will be talking about 6 of the most common mistakes new bloggers make on their Blogger Blogspot blog and how to avoid them.

1. Avoid Poor Content
I can't emphasize enough that the standard of your content will make or break your blog. Poor content = few return visitors. Good content on the other hand will attract visitors and keep them coming back to check out what's new.

Successful bloggers write clearly, know their subject and develop their own unique voice. A conversational style is often recommended but I suggest just write naturally and that naturalness will shine through.

Post quality well researched content that is interesting and topical. To do this you need to know your audience. Who are your readers? Do you know? If you don't know your target audience it will be hard to put yourself in their shoes which is exactly what you need to be able to do when you sit down to write a post. Ask yourself what are my readers looking for that would make them visit my site and read my post. Are they looking to be entertained, informed or a bit of both? Sign up for visitor tracking such as Google Analytics if you aren't already so you can get an idea of your visitor base. For help with implementing Google Analytics please read my post on adding Google Analytics to your Blogger blog.

2. Avoid Hopeless Headlines
I've seen some pretty hopeless headlines that don't give me enough of a clue about what a post is about to entice me into reading the article. If you want to attract readers to your site you need to grab them. That means putting some thought into crafting headlines that have punch. Remember your headline needs to reel your visitors in so make sure it is well thought out and punchy. Your headlines have to stand out to be noticed as so many people read headlines in RSS feeds.

Another important consideration when deciding on a headline is SEO. Consider what your readers might search under to find your post. "Blogging pitfalls" and "common blogging mistakes" are more likely keyword search phrases than "bad blogging practices." So knowing your keywords will help you craft headlines that are keyword rich.

3. Avoid Posting Too Infrequently
Once a visitor has found your site you want them to keep coming back. One way to ensure repeat traffic is to post frquently. Many new bloggers start a blog but find it hard to maintain a posting routine that is frequent enough to retain traffic.

Just the other day I had someone comment that one of the reasons why they liked my blog was the frequency at which I post. I try to post a new article every second or third day if possible. I usually am working on lots of other articles in the background so that I might have two nearly finished and half a dozen or so at various stages of completion. Using this system I have some flexibility and a cushion if anything comes up to interrupt my posting schedule.

Whatever you do don't make the mistake of posting just for the sake of posting otherwise your readers will see through this and you will lose readership.

4. Lack of Overall Focus - Trying to Paint the Whole Wall
So many new bloggers start their site without a clear focus. What kind of focus you may ask? Well making money is not enough of a focus. I am talking about identifying your niche and sticking to it. If you try and paint the whole wall your visitors will be confused about what your blog is about and you will very likely lose traffic rather than gain it.

Having a focus is important. On Blog Know How for instance, I concentrate on helping webmasters of Blogger blogs get the most out of their blog. I particularly aim my site at the new blogger and provide detailed step by step walkthroughs with them in mind. At the same time, however, I cater for all Blogger webmasters who access my blog. What I don't do though is go outside the theme of Blogger by writing about blogging in general. Instead I write articles that may be general in nature but are tailored to Blogger webmasters.

Yes I could get more traffic perhaps if I widened the scope of my articles to include Wordpress or blogging in general put what would then make my blog stand out from a whole heap of other blogs giving advice on blogging? Having a niche earns me traffic that is focused. Site visitors come with the goal of becoming more informed about using Blogger. If they go away having learnt more than when they arrived my site will have done its job and I may have just found myself a repeat visitor.

5. Avoid Too Much Advertising on Your Blog
New blogs need to build traffic and too much advertising can be a big deterrent in
achieving this goal. When your site is very new it doesn't pay to have too much advertising at all. Err on the side of less advertising rather than more. Bear in mind of course that Rome wasn't built in a day and your site won't be either. Have faith that your traffic will build and you can gradually introduce more advertising like Google Adsense as visitor numbers increase.

6. Avoid Too Many Social Bookmarking Buttons
Too many social bookmarking buttons can clutter up your blog and slow it down. Many people still don't know too much about social bookmarking so avoid the temptation to overuse these icons. Rather than use a whole bunch of popular icons like Digg and Technorati which can lead to a cluttered look and feel I use a single consolidated button like Add This. Share This is another popular button for sharing your posts.

To install a social bookmarking button on your Blogger blog follow the step by step instructions contained in my article on Add This

This article has discussed 6 common mistakes new bloggers make when developing a new Blogger Blogspot blog and given suggestions on how to avoid them.as visitor numbers increase.

Add Paypal Donate Button to Blogger

If you want to make a few bucks from all the hard work you are putting into your blog then consider adding a Paypal donate button to your Blogger blog (Blogspot blog).

Paypal Donate ButtonAdding a donation button will encourage all those happy readers to say a big thank you for helping them out. Not everyone will donate but you will get the odd generous soul who will willingly donate some chump change to shout you a coffee.

In this Blogger tutorial we will be adding a gadget to the Blogger sidebar or alternatively you could place it in the foooter of your Blogger template. We will be using a widget to contain our Paypal Donate Button and will not be changing your Blogger template. If you wish to place the donate button into your Blogger posts see the end of this Blogger tutorial for details.

Skill level is rated easy.
How to Add a Paypal Donate Button to Blogger (Sidebar or Footer Gadget)

1. Get yourself a Paypal account if you don't already have one

2. Login to your Paypal account

3. Click on the Merchant Services tab

Select Paypal Merchant Services Tab
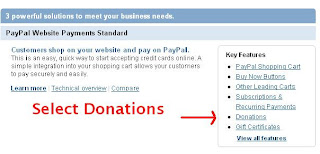
4. Choose Donations from the list of key features displayed in the right sidebar of the PayPal Website Payments Standard Option (first of 3 payment solutions)

Select Donations from Paypal Merchant Services page to Add to Blogger
5. From the Paypal Create a Payment Button screen choose Donation from the dropdown menu at Step 1. if it is not already selected.

6. Stick with the default button unless you wish to customize it

7. Choose your currency depending on your needs and location

8. Choose Donors enter their own contribution amount radio button unless you want to have a set amount

Paypal Create Button Steps
9. Ensure the Secure Merchant ID radio button is selected. This will prevent spammers getting hold of your email address

10. At Step 2 it is worth saving your button

11. At Step 3 Customize your checkout page by allowing donors to write a short comment by selecting the Yes radio button to special instructions to seller

12. Select the No radio button for Customer's Shipping Address

13. Select the Create Button button

14. Once Paypal creates the donate button code copy it by right clicking your mouse and choosing copy

15. Logout of Paypal

16. Login to Blogger if you are not already logged in

17. Go to Design > Page Elements

18. Click on the Add a Gadget link in the sidebar

19. Choose HTML/Javascript widget from the list provided

20. Paste the button code into the Content box of the dialog box that appears by placing the mouse inside the box and right clicking the mouse and then paste

21. Select a title like "Shout Me a Coffee Today!" or whatever you would like

22. Click on the Save button

23. Drag and drop your new donation gadget into the spot you want it to appear in

24. Click the Save button to ensure your changes are saved

25. Click View Blog to see your new donate button in the sidebar of your Blogger blog

26. Click on your new donate button and you will be taken to the Paypal Checkout screen

Paypal Checkout screen

Tips and Troubleshooting
  1. To Add a Paypal Donate Button to Blogger Posts
    The following instructions will add a Paypal Donate button to all new Blogger posts. Note previous posts will not be changed. You will need to hard code the button into your Blogger template to have the Paypal Donate button added to every Blogger post. (Please ask if you need help with this)

    1. Follow the directions (steps 1-16) as above to get your Paypal button code
    2. In Blogger go to Settings > Formatting
    3. Paste the Paypal Donate Button code into the Post Template box
    4. Save changes
    5. Click on New Post to see that the code will be automatically inserted at the foot of each new post. (you will need to be in Edit Html mode to see the code)
  2. To Add a Paypal Donate Button to Individual Blogger Posts
    1. Follow the directions (steps 1-16) as above to get your Paypal button code
    2. In Blogger go to the post you wish to insert the button code into
    3. Insert the button code taking care to change all instances of double quotes to single quotes
    4. Save post and publish as normal. (If you have trouble with the preview post button in the old editor in Blogger click on compose and then edit html)


This Blogger tutorial has walked you through the steps needed to add a Paypal donate button to your Blogger blog (Blogspot blog) including how to configure your Paypal button at Paypal. I have covered adding the button as a sidebar gadget or footer gadget or alternatively added to Blogger posts. Have fun!


Add Amazon Product Links to Blogger Posts


In this tutorial you will learn how to deep link a specific Amazon product directly into your Blogger posts so that the link will appear either on every post page or alternatively only on a selected post page. By deep linking a targeted Amazon product directly to your Blogger blog you can expect to increase your Amazon sales and to make extra money from Blogger. If you wish to learn more about adding Amazon widgets to your blog please refer to my earlier tutorial Make Money Add an Amazon Widget to Blogger


This tutorial provides you with a complete walk through of the process of adding Amazon product links to Blogger. I have rated the tutorial as moderate as it involves setting up the Amazon product link, converting the code and adding a block of code to your Blogger template. All these steps are within the capabilities of the average Blogger user provided you follow the step by step instructions below.

How to Deep Link an Amazon Product to Blogger Posts
This tutorial will show you how to add an Amazon Product Link at the foot of every post in your Blogger blog. If you want your link to appear only on a specific individual post page see Tips and Troubleshooting below for instructions.

Difficulty Level: Moderate
  1. Sign in to your Amazon Associates account. If you are not a member sign up is free to both Amazon.com and Endless.com
  2. Click on the Links and Banners tab
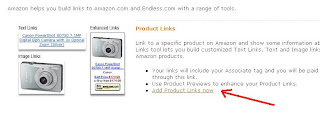
  3. Under the Product Links heading choose the Add Product Links Now link

    Add Amazon Product Links to Blogger Tutorial - Choose Add Product Links
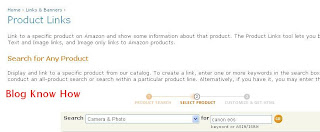
  4. From the Product Links page choose your Product Category from the drop down list and enter your search keyword phrase to identify the product you wish to link to. Hit the Go button.

    Add Amazon Product Links to Blogger Tutorial - Search for Desired Product
  5. From the search results choose the individual product you will linking to by clicking on the Get Link button on the right hand side of the product

    Add Amazon Product Links to Blogger Tutorial - Get Link for Specific Product
  6. You will now be taken to the Customize and Get HTML code page.

    • Select Link Type
      By default both the product image and text link will display but you can customize it to display the image only or the text only by checking the box alongside these options
    • Customize Link
      Choose the appearance of your product. With or without a border. Choose color options to suit your blog. I suggest you keep the default setting for the link opening in a new window. Amazon lets you see a live preview of your product on the right so that you can make any adjustments before embedding the code into your blog.

    Add Amazon Product Links to Blogger Tutorial - Customize Link
  7. Once you are satisfied with the product's appearance click on the highlight code button at the foot of the page and copy the HTML code for the Amazon Product Link.
  8. Open a Javascript to HTML converter such as Centricle. Paste your code into the content window and press the Encode button
  9. Highlight and copy the code that has been converted
  10. Login to Blogger if not already logged in
  11. Navigate to Layout > Edit HTML
  12. Back up your Blogger template as a precaution
  13. Check Expand Widget Templates box
  14. There are several places you may wish your product link to appear. I have assumed for the purposes of this tutorial that you want it at the bottom of your post. Therefore find the following code in your template:

    <div class='post-footer-line post-footer-line-3'/>
  15. Directly below this line paste the converted Amazon HTML code
  16. Click on Save Template
  17. Click on View Blog to view your link at the foot of every Blogger post including the home page view.


Tips and Troubleshooting
If you are writing about a lot of different products on your blog you may need to place targeted Amazon product links on your Blogger individual post pages. To have the Amazon Product Link only appear on a specific post page follow these steps.

How To Add an Amazon Product Link to an Individual Blogger Post
Before you get started you will need to know the full URL address of your Blogger post. To get this navigate in a new window to the specific post page of your Blogger blog and copy the address from the address bar at the top of your browser

  1. Follow steps 1 to 13 as per adding an Amazon Product Link to the foot of every Blogger post.
  2. Find the following code:

    <div class='post-footer-line post-footer-line-3'/>
  3. Directly below this line paste the following code:

    <b:if cond='data:blog.url == "your blog post URL including http://"'>
    Paste your Amazon code here
    </b:if>
  4. Replace "your blog post URL including http://" with the URL address of your blog post
  5. Paste over "Paste your Amazon code here" with your converted Amazon HTML code
  6. Click on Save Template
  7. Click View Blog and navigate to the individual post page to see your Amazon Product Link at the foot of your Blogger post (Blogspot post)


In this tutorial you have learned how to add an Amazon Product Link to your Blogger posts (Blogspot posts). I have also shown you how to embed an Amazon Product Link directly into a specific Blogger post. By adding targeted Amazon product links to your Blogger blog you can expect to make extra money from your blog. I would love to hear from anyone about their experiences of adding Amazon widgets or product links to their Blogger blog so if you have the time please let me know how you get on.

Google Adsense Tips for a Blogger Blog

As the Blogger platform is owned by Google it is not surprising that Blogger makes it very easy to add Google Adsense to your Blogger Blogspot blog. In this tutorial you will learn about different ways to add Google Adsense to your blog. Along the way I will be offerring a few tips about best placement of Google Adsense units. I have aimed this Blogger tutorial at new bloggers and beginners and assumes no prior knowledge of Google Adsense. Bear in mind that before you can start to add Google Adsense to your Blogger blog you will need to have created an Adsense account.

3 Ways to Add Google Adsense to Blogger
There are two main ways to add Google Adsense to Blogger: one is to use a Google Adsense widget and the other is to use a HTML/Javascript widget. There is also a third way, which is outside the scope of this article, which is to hard code the Adsense code directly into the template.

Adding a Google Adsense Widget to Blogger
An Adsense widget is a container for the Google Adsense code. Once created it is easy with Blogger's powerful interface to drag and drop widgets into different positions within your template. Google Adsense widgets can be added to the header, sidebar, footer, or body of your blog. A Google Adsense widget is created when you click on an Add a Gadget button in the Layout > Page Elements menu and then select Adsense.

How to Add a Google Adsense Widget to the Sidebar
The simplest way to add Google Adsense is to select Adsense from the range of gadgets offered in the Layout > Page Elements page. Assuming you are using one of Blogger's standard templates you will more than likely be adding a skyscraper unit 160x600 or similar to the sidebar.

Google will work out the color scheme of the ad unit for you according to your template. You can override these settings if need be and configure the colors manually but stick with the default unless you have good reason not to. Another decision you will need to make is about the format of the ad unit. You can choose between text only and text and image. Personally I prefer text units for sidebars as you get more bites of the cherry than with an image unit. Images only advertise one thing while text units may provide up to 5 different links. However if you need a particular look you might still need to go for the image unit which is why Google offer this flexibility in the first place. Bear in mind that the combined text and image units are considered to be the highest earners.

Add 160x600 Google Adsense Skyscraper

Add an Adsense Widget to the Footer
Another not so widely used place for a Google Adsense unit is in the footer of your blog. If your template has a footer (eg Blogger standard templates like Minima and Rounders both have footer sections) you can add a Google ad unit to this area too. Footers are becoming increasingly popular places to add information like Archives and Follower widgets so visitors are getting used to the idea of scrolling down to the bottom of the page to check out the footer.

A linked 728x15 ad is a good choice for a footer position especially if you have a Followers widget enabled in the footer. I place this linked ad unit directly above the Followers widget. I suggest you make use of linked units if you can - you are allowed up to 3 linked units per page. Linked ad units can earn revenue if strategically placed on your blog. Do keep in mind though that Google Adsense units nearer the top and middle of the page are more visible and are likely to be your top performers.
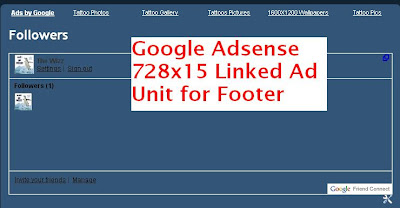
Add 728x15 Linked Google Adsense Unit to Blogger Footer

HTML/Javascript Widget
The second way to add Google Adsense to your blog is to use a HTML/Javascript widget. Make use of these if you want to have more control over your advertising and track your Google ad units. To get the code in the first place you will need to login to Google Adsense and create each ad unit in the size of your choice from the Ads for Content menu. This will allow you to set up a unique channel for each ad unit you create so that you can identify which are your top performing units. For every new ad unit generated Google Adsense provides the code which you will need to copy and paste into a HTML/Javascript widget positioned in either the sidebar or the footer position.

How to Add Google Adsense Between Posts
Blogger is such a powerful Blogging platform with so many great features. One of these features is the facility to set Adsense to appear between blog posts. All that is needed is to navigate to Layout > Page Elements. Click on the edit Blog Posts link and check Show Ads Between Posts (last in the list)from the Select Items menu. I usually select 336x280 ad unit size as this gives a good ratio of links for the size. I also prefer text units for this position too as again you are more likely to have a visitor click on a link if they are presented with quite a few. Save and view your blog. Blogger automatically places one of three Google Adsense ads directly below each of the first three posts. If you want to space the ads further apart you can do so though in my experience there really is no advantage in doing this.

Remember that you can have up to three ad units and up to three linked ad units displayed at any one time. If you have ads in another part of your blog for instance Blogger will automatically recognise this and only display 2 other ad units. Sometimes I notice there is a bit of a glitch with Blogger and it may not display sidebar ads in favour of 3 ads in between posts so you might have to play around with this a little to get the positioning you want.
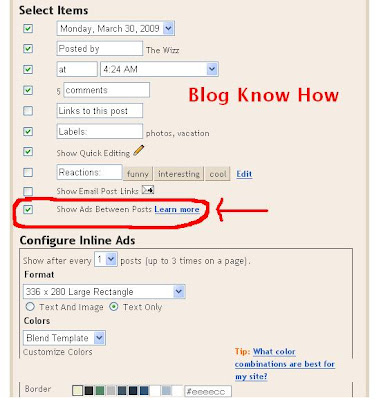
Add Google Adsense Between Posts

Note: To Center the Google Adsense Ad Unit
  1. Go to Layout > Edit HTML
  2. Check the Expand Widget Templates box
  3. Make sure you back up your template before proceeding
  4. Find the code block beginning with this line:

    <data:defaultAdStart/>
  5. Scroll down until you find these lines:

    <div class='inline-ad'>
    <data:adCode/>
  6. Change these lines to the following:
    <div class='inline-ad'>
    <P ALIGN='center'><data:adCode/></P>
  7. Save template


In my next couple of articles about Google Adsense I will be discussing how to add Google Adsense to other parts of your Blogger template including in the header, before the first post, after the last post, and in the middle of posts. This article has covered the basics of placement of Google Adsense for Blogger and offerred some suggestions about best placement of Google Adsense ad units.


Home

Thursday, September 1, 2011

Anna returns, double celebration for his village

It was a double celebration at Anna Hazare's village Ralegan Siddhi as the anti corruption movement's poster boy returned home for the festivities. Hazare looked weak, but was clearly happy to be home.
Like every year, this year too he was expected to head the festivities, but given his health he preferred to stay away.
"I whish he gets well soon. I will come back to see him tomorrow," said a villager.
Anna's journey back was almost as dramatic as his 13-day fast in Delhi - a backdoor exit from the hospital to avoid the waiting media. He took a kingfisher flight to Pune with awe struck co passengers.
"I have not seen god, but I have seen Anna," said a co passenger.
As Anna Hazare prepares to spend the next 10 days of Ganesh Chathurthi in his village, the task ahead is clear - regaining his strength and then pushing ahead for a strong Lokpal Bill in Parliament.
(Follow Me on Facebook and on Twitter for updates that you can share with your friends.)

Happy Ganesh Chaturthi to all


http://nonzie.com/wp-content/uploads/2009/07/ganesh-chaturthi-graphics1.gif
http://www.carnaticcorner.com/hig/ganesh15%5D.jpg

cid:image001.jpg@01CB4F40.9D57F680

cid:image002.jpg@01CB4F40.9D57F680

cid:image003.jpg@01CB4F40.9D57F680

cid:image004.jpg@01CB4F40.9D57F680
 
          Keep Smiling……………..
Vinayaka Chathurthi Wishes and Happy long weekend:)

Popular Posts